Tuesday, June 14, 2011

Termite Trails: Pheromone Imitation

Adapted from University of Kentucky's Entomology Dept: http://www.uky.edu/Ag/Entomology/ythfacts/resourc/tcherpln/termtrails.pdf

This week's activity is a prime example of a natural phenomena that can provide hours of entertainment. Termites will follow the ink lines of Bic® ballpoint pens! All you need is a piece of paper, a termite, and a Bic® ballpoint pen and you'll have unlimited amounts of fun! Read on to learn more!
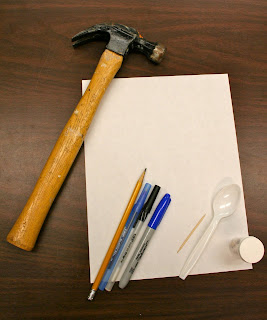
Supplies:
1. Termites (there are a couple ways to go about obtaining them; order them from Carolina Biological Supply or a similar supplier, or you can go for a termite hunt!)
- If you choose to do the termite hunt option you will need an implement to pry or chop apart the decaying wood and expose the termites. We used a hammer, you could also use a screw driver or axe. As always, make sure you use proper precaution when using any tools with young children.
- This will also require that you have a container to store the termites in between the collection and experiment. Keep in mind live specimens are only viable for about 24 hours.
2. A variety of writing utensils
- At least one should be a Bic® ballpoint pen (blue ones specifically are rumored to be the best performer)
3. A paintbrush, toothpick, or other utensil with which to handle the termites
4. Plain Paper
5. A shallow box or tray to lay the paper in and contain the termites while experimenting

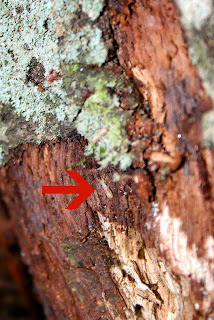
Below: Photos of what termites look like when found in the wild.


Procedure
  1. Collect/order your termites
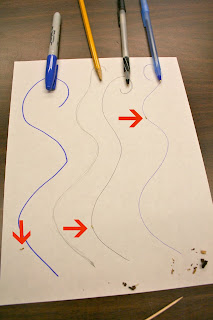
  2. Draw your lines on your paper with multiple writing utensils. (keep in mind that they don't respond well to sharp turns or intersecting lines, circles and curvy lines work the best)
  3. Watch! Let the students discover what writing utensils the termites will follow.
  4. Reflect on which utensils the termites follow and the purpose of pheromones in termite colonies.
Below: You can see the two termites following the Bic® ballpoint pens are following their lines and the one near the Sharpie® line is not responding.


Watch the video from our experiment to get an idea of what to expect!


Follow Up Questions and Information
While the participants are making observations, you can ask them to call out their observations and record them to use when drawing conclusions at the end.

What's really going on here? The worker termites in this social insect species are blind. Pheromones, therefore, are a major form of commuication in the colony. When termites follow the pen lines, they are actually following a chemical in the pen ink that imitates this natural pheromone.

Participants will be amazed at the power these pens seems to exert over the termite. Ask youth to reflect on why the termites would exihibit this behavior. See if they can come up with other examples similar to pheromones or chemical signals.

Happy Trails!

Tuesday, May 24, 2011

Strawberry DNA Extraction

Adapted from Arizona State University’s Chain Reaction Extract DNA from a Strawberry activity found at: http://chainreactionkids.org/activities-extract-dna-from-a-strawberry

It's a great time of year in NC, because for a few weeks now it's been Strawberry season! Strawberries top my list of favorite fruits so I often get overzealous when buying them and end up having to pick out some overripe berries. What to do with those berries? If you're a 4-H leader, a 4-Her, the parent of a curious kid in need of entertainment, a kid at heart, or any combination of the above you should try this strawberry DNA extraction experiment!

Supplies

  • Rubbing Alcohol (2 teaspoons or slightly more per extraction)
  • Small bowl
  • Extraction liquid (enough for a couple batches of strawberries):
    • 1/2 teaspoon salt
    • 1/3 cup water
    • 1 Tablespoon dishwashing detergent (e.g. Dawn)
  • 3 strawberries (with green tops removed)
  • Small plastic zip-top bag
  • Funnel
  • Cheesecloth or coffee filter
  • Tall cup (tall enough to put the funnel in without the funnel tip reaching the bottom)
  • Dropper or spoon for liquid transfer between containers
  • Test tube or small clear glass jar/canister
  • Bamboo skewer or toothpick depending on the size of your test tube or glass jar used for extraction (see directions for details)

Procedure

  1. Put the Rubbing Alcohol in the freezer. It will chill while you complete the first phase of the experiment.
  2. Combine the ingredients for the extraction liquid (salt, water, and detergent) in a small bowl. Set aside.
  3. After removing the green tops from the strawberries place them in a small plastic zip-top bag, press any extra air out and then seal the bag.
  4. Mash the strawberries up until all of the contents are squished (around 2 minutes). Set aside.
  5. Put the funnel in the cup and place the cheesecloth or coffee filter inside the funnel to prevent the strawberry chunks from getting into the glass.
  6. Take your bag of strawberry mush and, pushing the contents away from one of the bottom corners, cut that corner off and push the contents out onto the cheesecloth or coffee filter and allow the liquid to flow into the cup for a few minutes.
  7. Remove the cheesecloth or coffee filter and all of the strawberry pulp inside it and throw them away.
  8. Pour the contents of the cup (strawberry liquid) into the clear jar or test tube until the container is about ¼ of the way full.
  9. Remove the rubbing alcohol from the freezer.
  10. While tilting the jar or test tube use a dropper or spoon to gently pour the rubbing alcohol down the side of the jar or test tube taking care that the strawberry liquid and rubbing alcohol don’t mix.
  11. Allow the contents to sit for a few minutes and you will begin to see some white cloudy material collecting between the two layers of liquid. This is DNA!
  12. Once you see the DNA you can use the bamboo skewer or toothpick to remove some pieces of the DNA for a closer look.

Follow Up Information and Questions

So how did this work? Well, the extraction liquid you created by mixing the water, detergent, and salt caused the strawberry cells to lsye or split open and spill out their contents including their DNA. Then the addition of the alcohol caused this DNA to precipitate out of the strawberry liquid.

Now that you know how to extract DNA using common household items why don’t you try it with some other fruit? What other fruit would you choose? Why? Do you think another type of fruit will work as well as strawberries did?

Happy experimenting! Let us know what you thought and what other fruit you tried in the comments!


Wednesday, January 6, 2010

Dodder Attacks Tomato by Sense of Smell

Plants that smell like rotting meat, pinecones that must erupt in flames to disperse seeds, or vines that drain the life force of other plants... I think you know my inner geek burns the brightest at the prospect of hearing tales of weird and unusual plants. I was haunting the NPR archives and came across this really fantastic story about the biology of the dodder plant. A horrendously invasive weed of which no good can come and yet you have to admire its tenacity and "deviousness" in seeking out its prey.

Listen to the story from NPR:

Watch the dodder attack a tomato seedling:

Researchers from Penn State discovered Dodder's unique properties:
(Abstract) "The importance of plant volatiles in mediating interactions between plant species is much debated. Here, we demonstrate that the parasitic plant Cuscuta pentagona (dodder) uses volatile cues for host location. Cuscuta pentagona seedlings exhibit directed growth toward nearby tomato plants (Lycopersicon esculentum) and toward extracted tomato-plant volatiles presented in the absence of other cues. Impatiens (Impatiens wallerana) and wheat plants (Triticum aestivum) also elicit directed growth. Moreover, seedlings can distinguish tomato and wheat volatiles and preferentially grow toward the former. Several individual compounds from tomato and wheat elicit directed growth by C. pentagona, whereas one compound from wheat is repellent. These findings provide compelling evidence that volatiles mediate important ecological interactions among plant species."

Read the research article from Science that this was based on:

Friday, December 18, 2009

Junior Master Gardener: Plant Person Timelapse

Watch this!


I love projects that are cheap, easy and have a high impact. Junior Master Gardener has a great activity that allows youth (of ALL ages) to observe seeds germinate in a really fun way.

First: Use a nylon stocking and fill it with a tablespoon or two of rye grass seed. They quick lawn fix mixes at your nursery retail center usually contain a high percentage (upwards of 90%) of rye grass seed. Rye grass seed germinates easily and quickly.


Secondly: Add some peat-based potting soil to make the plant person's head. Push the soil to the toe of the stocking and form a ball. Tie a knot at the base of the soil.


Thirdly: Glue googly eyes onto the face (hot glue works really well, but Elmer's will do in a pinch). Take a permanent market to draw a smile. You can also channel your inner crafty diva or dude. JMG recommends taking a pop can (soda can for the rest of you) and glamming it up with construction paper, pipe cleaners, glitter (of course!) to make your plant person.


Finally: Dunk your plant person into a bowl of water to saturate the soil (just in the beginning) and initiate the germination process. Tuck the nylon stocking tail into some kind of water reservoir (cup, mug, jar, pop can) to continuously wick moisture into the soil. I often spray a mist of water on the top of the head every day as well.


You should see sprouts in about 3-4 days and a full 'crop' of 'hair' in just a week!

The Plant Person activity hails from the Level One Teacher/Leader Guide from the Junior Master Gardener 4-H program. The book brims with similarly engaging lessons that teach a multitude of concepts from plant growth and development to insects and ecology. It is easy to start a JMG club, simply call your county Cooperative Extension office and talk to your 4-H or Horticulture/Agriculture Agent. To find out more about the program you can visit our North Carolina website or visit the national JMG website.

Wednesday, October 14, 2009

NC State Fair - Flower and Garden Show

My husband and I have a particular route we follow when navigating the state fair. We head straightaway for the giant pumpkins, appropriately ogling their size and splendor before moving on to enviously scrutinize the honey collection. We give a quick hello to all the mama and young entourage animals (goats, horses, cows, pigs etc) and then we are off to the poultry tent. After finding the perfect thanksgiving turkey we head to our favorite spot, the
garden and flower show (of course!).


This year I was asked by Erv Evans, the new superintendent for the Flower and Garden Show (and good friend to youth and horticulture!), to do a display featuring the North Carolina 4-H Plant and Soils program. With a little paint and carpentry and a delightful selection of plants (Many thanks to Diane Mays, curator for the NC State conservatory), it is a start for what could be a nice little corner to showcase ideas for youth and gardening.


The NC State Fair offers many opportunities for youth to showcase their plant skills and knowledge. Youth have their own division in the flower show and can enter cut flowers, arrangements, terrariums, container plantings and even a craft or animal made from a natural product. The picture below was entered in the adult division, but caught my fancy as place to imagine all sorts of stories (faery galas and such) and I think our youth could come up with some similarly great ideas. Read all the specifics in the fair premium book (pg.53):


Another way for youth to be involved is to design and build a garden in the garden contest. The garden contest offers prospective competitors a 24' x 24' plot to create an amazing space according to a specific theme. A few of the themes for 2009 include; "Where the Wild Things Are," "Primary Colors," "Magical Children's Fairy Tale Garden," "Rooftop or Balcony Garden," and "World Heritage Vegetable Garden." All of these themes offer a chance to learn more about horticulture and enable youth to communicate their ideas to a large audience of fairgoers.


One of my favorite gardens for 2009 comes from the Wakefield High School FFA (Wake Forest, NC) students. Last year their garden won Best in Show for the entire garden contest. This year they included a diverse collection of plant material that emphasizes the wild nature of
Max's adventure. Some of the plants the students grew that you might like to try:
  • Paddle Plant (Kalanchoe thyrisflora)
  • Flying Dragon Tree (Poncirus trifoliata)
  • Joseph's Coat (Alternanthera)
  • Arrowhead Plant (Syngonium podophyllum 'Berry Allusion')
  • Iresine 'Blazing Lime'
  • Agave 'Variegated'
  • Holly Fern (Cyrtomium falcatum 'Rochfordianum')
The students painted the different character's from the storybook, incorporated quotes (my favorite: "Let the wild rumpus start!) and made Max's bed, complete with a "tree canopy." There are a lot of other great gardens from home gardeners, community college students, garden clubs and more.


If you cannot make it to the state fair consider starting a garden contest with your local 4-H community clubs. You might have a particular theme or focus on one aspect of horticulture. Many NC Cooperative Extension offices have a grassroots program called "Mini-Gardens" where youth grow their own vegetable gardens throughout the summer and are mentored by the horticulture and 4-H agent, and often Master Gardener volunteers. Youth learn all sorts of life skills from responsibility, record keeping, problem solving, critical thinking and communication. For more information contact me at liz_driscoll@ncsu.edu or your local cooperative extension office.

Thursday, October 1, 2009

Evening Primrose Parties

The legend of the evening primrose has haunted me for a long time. I had heard this plant's tale whispered with giddy delight and with a sense of some self-importance. The story of the evening primrose follows that just dusk as begins to settle, the flower buds unfurl into full bloom right before your eyes. I mean in 30-seconds-right-before-your-eyes-kind-of-time. For years, I had never been entitled to witness this event, until this summer.

The rain hadn't come in a long time and I was reaching peak annoyance at having dragged the hose from one end of the yard to the other. As I muttered and growled at the universe, the corner of my eye caught the movement of something yellow. It was the evening primrose beginning its nightly performance of blooming. The buds are all twisted up and start opening with a bit of a twitch and a hitch and then languidly stretch and unfold their pretty butter petals as you stand by and gape with a bit of awe and amazement.

My neighbor was watering across the street and I screamed at her to come over. She thought I found a snake and was very uninterested in what was happening in my part of the world. I hollered at my husband who was laboring in the backyard, watering all the vegetables. They both ended up coming over thinking something was wrong and I was too excited to be able articulate the little drama that was taking place. By the end of the week all the neighbors had been dragged over to watch and the kids were clamoring with questions.

'Tina James' Evening Primrose is a great cultivar to try in your garden. Here is a real-time video so that you may all share in the joy and wonder. Have an evening primrose watching party, it will be sure to delight.